Living in Florida for the past 7 years and my husband being the hottest creature on earth, he doesn't own many pants to speak of. Even in the winter all he can stand to wear are short pants, or as he would call them little boy pants. So upon graduation from college and re-entering the working world where you must wear pants, he requested I make him some trousers. Here is the documented journey I took making my second pair of trousers. My first pair was not recorded due to the numerous errors and the fabric failing in my husbands nether region. His boss said ; "Do you know your pants ripped?" He said "Where?" She said "In the bottom area." Oh, how embarrassing. Not only for him but for me because I chose some inferior fabric to cover his rear ^_^
I drafted his trouser sloper from the instructions in two books, one by Jane Rhinehart "How To Make Men's Clothes" and the other by David Page Coffin "Making Trousers For Men and Women". The latter gives intricate instructions on drafting the details like pockets and cut on zippers but lacks the instructions on drafting the actual pants. That is where the ancient book by Jane Rhinehart comes in. I wouldn't feel comfortable using the detailing in this book because Mike would most likely end up looking like he belonged in the 1970's, when the book was published but it is a must in basic drafting.
I chose the classic On-Seam Pocket for these pants and added the needed 1"outlet to the final sloper. I chose the bottom fold pocket bad and cut out a 7 1/2 x 18" rectangle of lining then arranged it under the pant front right side up. It extends 3/4" above the top of the pant and the whole thing gets hand basted together. Love my wonky hand basting?
Next I cut the pocketing to match the outlet and pocket fold line. Pocket making is where you can really add detail to menswear but for my early attempts I chose to go basic. No crazy piping or flaps and button tabs. Just the most basic I could go without looking cheap or home-sewn...ewww what an ugly word.
This part is the original purpose I bought the famed Stitch Witchery. The pocket opening is not only reinforced but the lining is also held securely in place, not only relying on my crappy hand basting for proper placement.
The cut on facing was then folded over and zigzagged to the pocket facing only. Be sure not to catch the pants front or off to the seam ripper you will go.
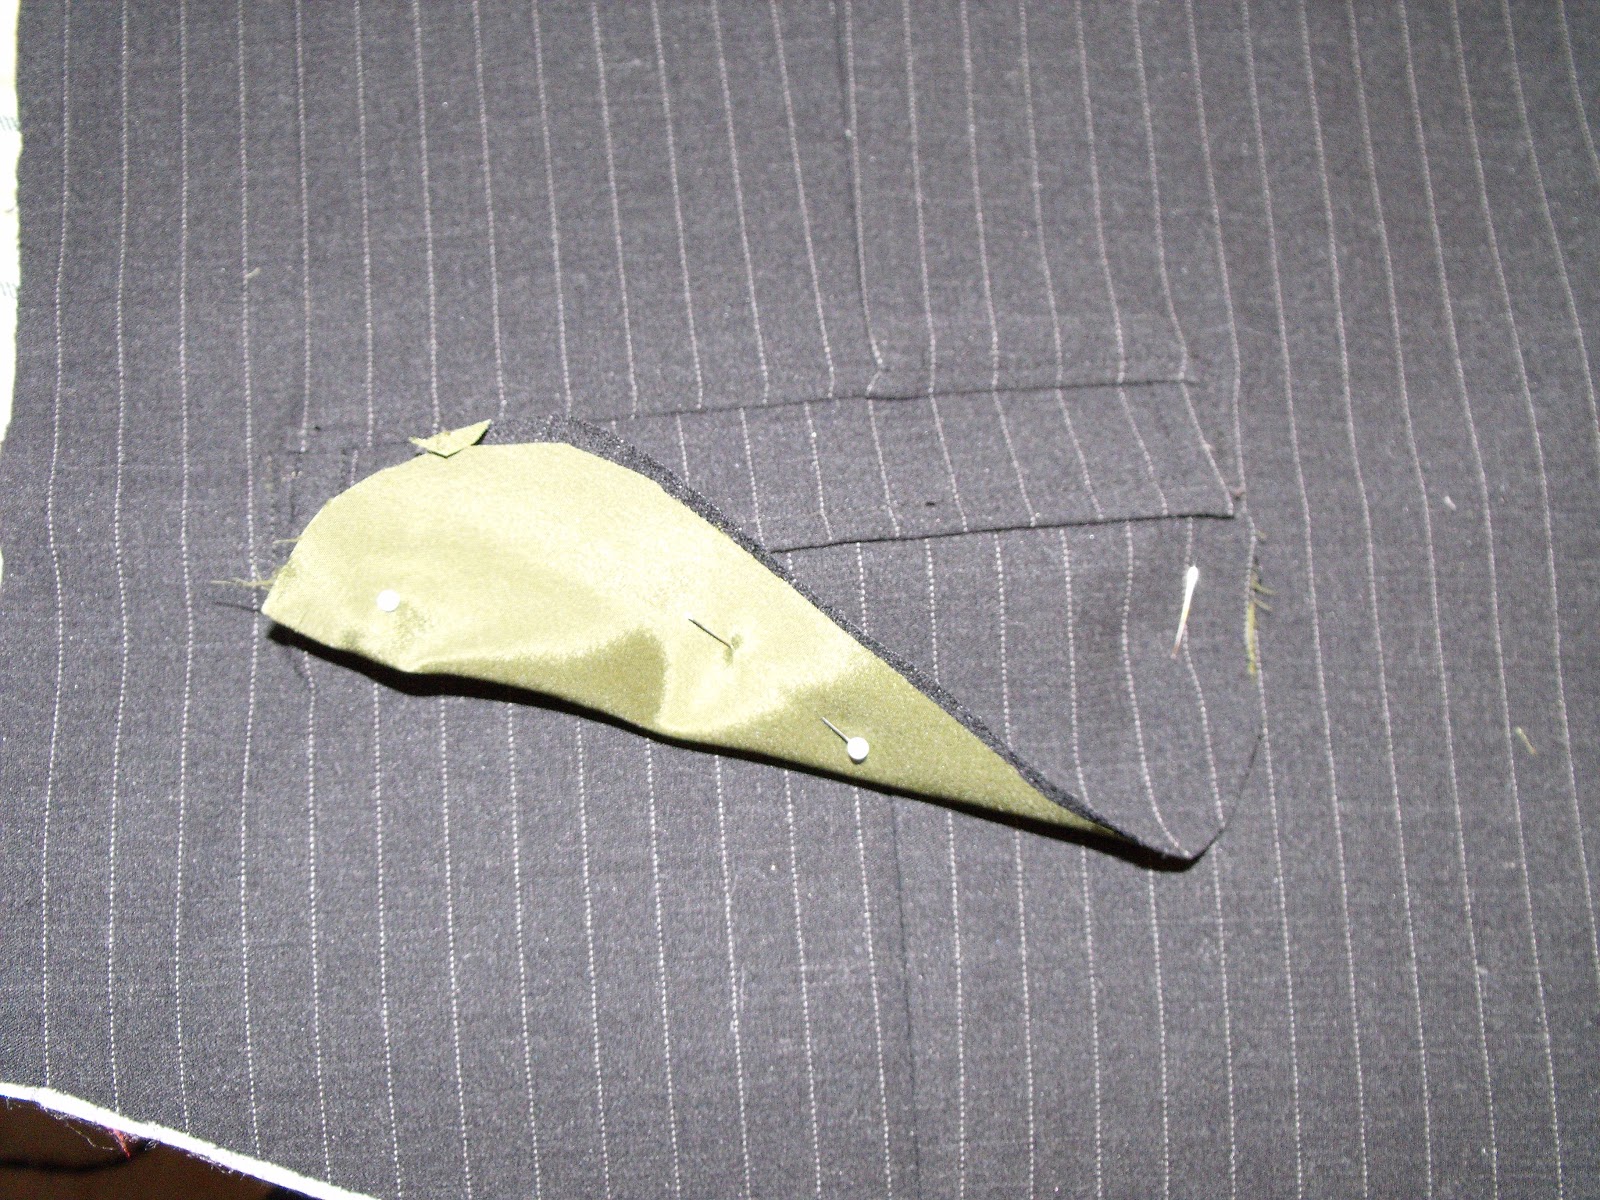
Then the pocketing is folded along it's long edge and placed so the open side extends beyond the side seam allowance. As the picture shows I then slipped a scrap of suiting to be used as the facing between the pocketing layers , aligning the edges and zigzagging it in place, leaving about 1" of the lower edge unstitched.
Now you are ready to finish the bottom edge of the pocket. I turned the pocket inside out and stitched the two layers together as far along the pocket as possible. Then used my serger stitch to finish it since this fabric loves to unravel even with a zigzag.
I turned the pocket right side out again and topstiched along the edges to enclose the raw edge on the inside of the pocket. This is a nifty way of of finishing pocket bags so there are minimal raw edges exposed. My thoughts are that your work should look just as nice on the inside as it does on the outside. Especially when your husband destroys clothes like mine does <3
Now back to the pocket outlet. I made a 1" clip just into the pocketing next to the pant fabric, right below the pocket mouth. This allows the pocketing layers to be folded out of the way when sewing the side seam. Finally before starting on the side seams I topstitched the edge of the pocket mouth. Once the side seams were done I made bar tacks at each pocket mouth through all the layers.
Next step is DOOM! Otherwise known as a zipper. Ugh, it is the most time consuming and challeging part of trousers but David Page Coffin's book gives you amazing insight and step by step instructions to make it bearable. Everything is marked up and an x is placed where the zipper stop will be. I chose a metal zipper because Mike is forever busting those cheap poly zippers on his amazingly expensive suits. I don't know how the boy does it.
With the book's advice I chose a cut on fly shield which is awesome. It limits the bulk and would be especially nice on women's pants where you really don't want any bulk in that area. O_o For men's pants the left side, the overlap is interfaced and the right side, the underlap is lined. For women's it is the opposite and for my first pair I made this part backwards. Ooooppps! Mike has to take his belt off to pee in those pants.
With right sides together I stitched the lining to the pants with a 1/4" seam allowance. I then folded the lining out of the way and stitched the pant fronts together in the crotch curve starting 1" from the inseam and stopping at the x. I switched to a basting seam all the way to the waist to make opening the zipper seam easier.
Then the pants are opened and a crease is pressed along the basted section with the pants face down and flat. This will allow for perfect zipper placement.
In the same manner that I use for sewing a zipper in a dress I pinned the zipper face down along the basted seam. Then only difference is the placement of the teeth. Notice I positioned the teeth completely on the overlap/interfaced side. That way when the pants are complete the fabric wont get caught in the zipper.
The zipper tape is stitched to the underlap/lined side with the lining and pant front folded out of the way. Because I chose a sewn on waistband the zipper was positioned 2" above the waist. For my next pair of trousers I am going to alter my sloper for a cut on waist band. I think this will reduce bulk even more. No one wants extra bulk in their waist area!
The zipper is folded over onto the underlap/lined side and pressed. Beware: metal zippers although very sturdy get VERY hot after being pressed on a wool setting. Also they stay VERY hot for about 5 minutes afterwards. So go indulge your ADHD side and find something to distract you for about 5 minutes...or get burned... repeatedly...like me x_X Wanna see the zipper teeth burned into my fingers?
Flipping the zipper back onto the overlap/interfaced side I stitched the zipper tape to the fly facing with the pant front folded out of the way. Next, I removed the basting stitches with my well used seam ripper.
Then I finished forming the fly shield lining by pressing under it's long raw edge. Carefully I folded the fly shield back and basted it in place along the waist. The pressed edge will then become finished when you topstich the overlap.
The overlap/interfaced side is basted and marked for topstitching while wearing Hello Kitty slippers. This part is very important if you too sew on tile and want your feet to have a squishy home but also wish to look like a giant 12 year old. Thanks Mom for the 28th birthday present any little girl would love!!
This is where you should pay close attention to the metal zipper stop that is lurking under your machine's needle just waiting to crush it and fling the pointy metal fragment at your eye. Yup, I broke three needles here trying to topstitch over the zipper stop. Unlike the cheap poly zippers your needle has no chance against the metal zipper stop. A tip from the eyecare professional/klutz: you should wear glasses when sewing!
The underlap/lined side is topstitched along the zipper tape catching the long pressed side of the lining all in one step. Then all the shield layers are bar tacked in place.
Now to finish the lining in the crotch area. It is not only nice to have a silky lining for your nether regions, it also provides reinforcement for the frequently stressed inseam of trousers.
I pressed the raw edges under and stitched a 1/4" seam allowance using a bit of stitch witchery to temporarily hold the slippery lining in place.
Then I carefully trimmed the overlap/interfaced side to match the fly lining and stitched them together only to a point where it wouldn't interfere with opening the zipper- about 2" along the crotch curve.
This is what it looks like finished. Mike really likes this silky lining that in a former life was an ugly pair of pajama pants. Oh, did I mention I save all kinds of scrap fabric, buttons and zippers from old clothes. Anything to bring my costs down, which make my little finance wizard of a husband happy and quiets the buyer's remorse voice in my head.
Now, since I chose a sewn on waist band I needed to remove the 2" of extra zipper at the top of the waistband. This was like pulling teeth! Literally, with needle nose pliers I pulled out the individual teeth leaving the tape intact so it could become part of the waistband. I only did the small segment you see in the picture because it was not easy and I figure I could just cut off the extra teeth at the top.
Warning: Do not forget to stitch a new zipper stop at the top of each side of the zipper tape. If you forget the zipper will inevitably pull right off when zipping closed and probably fall into the toilet never to be seen again. Making the chore of removing a broken zipper and sewing in a new one on your to do list...ARG At this point the laborious zipper is finished and you can smile happily like me in this Subway commercial like picture. Remember the booty and leg seams are not yet sewn so do not infer that my hunny is husky. Look how happy I am to be finished with the zipper...you can see it in my toes!
The waistband pieces are interfaced to the seam allowances to allow for easy stitching and folding. I cut 4 pieces for the waistband and they are divided at center back and faced not folded.
Starting with the inner waistband and with right sides together I stitched a 1/4" seam allowance stopping at the pants edge, leaving the overlap unstitched.
This is where I had a problem. I ordered 2 yards of petersham from a millinery supply company online. I am fairly certain I order 2" wide but when I got it in the mail it was only 1 1/2" wide. So because I procrastinated and I needed these trousers done yesterday I had to improvise. I attached the petersham with Stitch Witchery end to end. That's right, I did it wrong the first time and had to rip it apart.
The ends are butted up against each other just overlapping 1/8" and that is where the Stitch Witchery becomes vital, otherwise there is nothing to pin it to. Then I pressed it towards the wrong side of the waistband and since it was too short to become incorporated into the outer waistband like intended I just based it in place. In the picture you can see the random stitch going through the center of the inner waistband.
Now the outer waistband is stitched right sides together with a 1/4" seam allowance catching the extension. Everything is pressed wrong sides together and the raw edge of the outer waistband is turned under, but not yet topstiched. I made an alteration since my first attempt in trouser making and decided to attach the belt loops at this point.
I used the belt loop pattern in David page Coffins book and cut out 6 funky shaped to be belt loops. Ignore the different fabric, this was my first pair of trousers and somehow I didn't take a picture of this step the second time around. Just imagine green wool instead!
Then I pressed each loop in half right sides together. This is a super nifty trick for turning tiny things. I tacked on a long piece of garden twine to the loop at the very end of the inside. I knew all that garden paraphernalia would come in handy even now that we have a 1 square foot yard ^_^
Then I postioned the twine along the right side of the fabric and stitched the sides together with a 1/4" seam allowance. And voila! All you have to do is trim the seam and pull the twine and it turns itself right side out. Totally awesome possum!
Then I hand basted the 6 loops in equal amounts along the waistband and topstitched the whole thing closed. Next, I zigzagged the raw edges of each loop, pressed the edge down and topstitched each in place. Upon further evaluation, i.e. Mike trying to put on his belt, I should have tacked the end of the loop below the waistband as seen in many ready to wear trousers.
There is very little room to slide a belt into these loops and downright impossible to get dressed unassisted. Or so he says....maybe he just wants me to touch his booty. Maybe I should hire a Mammie to help him get dressed. Also I messed up on the first two loops by positioning them too close to the pants opening that he has to take his belt out of the first two loops to pee. Ooopps more taking off the belt just to use the restroom.
Next the legs are sewn with right sides together in a 1/4" seam allowance. Then the inseam is carefully stitched in the same manner and reinforced with some back stitching.
I made a eyelet button hole on the waistband extension and hand stitched a 3/4" button on. I should have purchased those little metal clapsy things that you find on the inner waistband of ready to wear pants. I think this would help with the issue that the trousers sort of pivot with movement only having this one button to rely on.
Finally the cuffs are folded and pressed then topstitched in place. They really should be sewn with a blind hem but I haven't yet figured out how to use that wonky thing.

So here is the finished trousers and vest combo, which in the nuclear heat of Florida is an awesome option to the two piece suit. I have to mention the amazing fabric store I purchased this suiting at, Jay's in Pasadena. No Pasadena isn't some froofy upscale place in Florida, it is just a run down part of the homeless capital, St. Petersburg, that happens to have a huge fabric store. Quite a while ago I said screw Joann's (except on black Friday when you can't say no to those deals) and devoted myself to driving about an hour and a half to Jay's because it's worth it. Joann's has crap for suiting and shirting and really any nice apparel fabric. Plus they kinda have a monopoly on fabric in this area and charge way too much 364 days of the year. Sorry that was my Joann rant, I'm done now! Hope you liked me putting my hunny in some pants.... finally!
My husband, Mike has been begging me for months to make him some work clothes and I just finished a complete outfit. Here is my adventure making a waist coat. I started with Burda's pattern #3403 and make some alterations on the shoulders based on his dress shirt slopers. Mike is a child of the 90's and his posture reflects that mellow, laid back era well. He has sloped shoulders so the pattern was altered to fit them better. I found that this pattern could easily be used successfully without many alterations. I do believe the vest runs a bit big for modern styles and I took it in 5/8" on each side. Otherwise the length was perfect, he is 5' 10" and it falls right where is should at the waist. As with my past experience with Burda patterns the directions leave something to be desired. This is not the first time that a step was left out but if you read ahead I will be adding in the missing information.
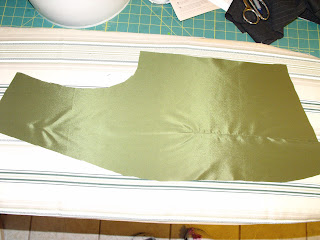
I chose this green silk taffeta for the lining because it is breathable, which is very important in Florida, has a bit of a stretch and above all it was very inexpensive. I found it at Walmart- yeah Walmart! I was on clearance for $1.00 a yard and given the choice I would have gone with a different color, maybe burgundy, but olive green was the only option.
I started this project with stitching the darts. I remembered why I hate using commercial patterns vs. slopers with this project. Using a tracing wheel and tracing paper is tedious and clumsy but it works.
On to the task of pocket making, which can be a chance to show your personal style. In my opinion there are not many opportunities in menswear to do so but since this was my first attempt using this pattern and making a vest I chose to follow the pattern's detailing. I interfaced the two welts, pressed them in half and stitched a 1/4'' seam allowance in the two short ends.
Then I turned them, being careful to make the corners a fine point- thanks to my point turner, and top stitched the edges.
My first attempt at positioning the welt on the front was very, very wrong. I positioned it so that the raw edge was pointing up instead of down. I then realized my error after almost completing the pocket to the point of turning. Duh! Something didn't look right, so away with the trusty seam ripper. A half hour later and some new scratches in my left thumb nail I positioned it correctly and basted it in place.
Then I positioned the pocket facing right side down and pocket lining on the vest front perpendicular to the welt's position. All pieces were basted in place then finally stitched with a 3/8'' seam allowance with the pocket facing 1/4'' shorter on each end of the stitch than the lining.
On the wrong side of the fabric I then drew a middle line between the two final stitching lines and made two arrows pointing in. This will be my cutting line. This technique I have done previously in making double welt pockets on trousers and on the sleeve placket on dress shirts. Everything is sewn on to the right side of the garment then slashed allowing for turning with perfectly finished edges. I start the slash with my rotary cutter.
The little triangles can be tricky to control when turning so I broke out the "Stitch Witchery" to hold them on place. I first discovered this ingenious product when I was making trouser pockets a few months ago and since then I have found a time saving use for it on every project. It is more sturdy than glue basting and more consistent than trying to pin something tiny. I'm sure Stitch Witchery will be mentioned again in the near future.
After lots of pressing the welt and pocket edge when the facing and lining meet are ready to be edge stitched. I used black embroidery thread for this and payed close attention to the pocket bag so I didn't catch it in the stitching.
Then I pulled the pocket out, pinned the seams together and stitched a 1/4'' seam allowance. I then trimmed the seam allowances a bit and turned it right side out. Now the raw edges are inside the pocket.
Then I edge stitched the pocket bag enclosing the raw edges. This is a neat trick that I adopted from trouser making. It was lucky that I had previous experience finishing pocket bags because this step was very vague in the Burda pattern.
So here is the finished pocket. My next vest I am going to play with the design because all though it is fine, I don't care for the large opening. The edge of the pocket is directly lined up under the edge of the welt and leaves an opening almost as large as the welt itself. I haven't quite worked out how to make the opening smaller but I will let you know when it has been done.
The next step is to sew the shoulder seams. With right sides together I stitched a 5/8'' seam allowance and pressed the seam open. At this point I took the chance for a fitting. According to men's fashion a waistcoat should fall right above the belt line but not be too short as to expose the shirt fabric in the front. Mike wears a short jacket so the possibility of it being too long was looming in my mind. Luckily it was a perfect length!
Then next step in the pattern is to sew the facing to the lining. This step really could have been done at any time previously and in the future I will do it along with the dart sewing. This seam requires a bit of easing because you are joining two unmatched pieces. With right sides together they will not lay flat. I used a 5/8" seam allowance and pressed the raw edges toward the lining.
This step is where I initially got confused and had to beg Mike to pause Dr. Who so I could have quiet to think. With right sides together the lining and fronts are stitched together at all seams except for the sides and shoulder seams. Then the seam allowance is trimmed, curves clipped and the whole thing is turned right side out through the side and shoulder seams.
Why I was confused is because the directions state sew all seams except the side seams. It didn't mention the shoulder seam so I pinned everything together and tried to turn it realizing everything needed to be pulled through the shoulder seam as well as the side seam. I am glad I didn't follow the pattern blindly or I would have gone after the seam ripper yet again.
This next step is where the huge flaw is in this pattern. It completely leaves out the back lining. So again Dr. Who had to be paused and Mike may have been questioning if his begging for men's wear was really worth it ;p I stitched a 5/8" seam allowance at all seams except for the side seams and shoulder seams, clipped curves and trimmed seam allowances.
Then the fronts were pulled though the shoulder seam and the back was turned through the side seams. This technique is pretty awesome, leaving all seams except for the shoulder and side completely enclosed. I will definitely be adding it to my bag of sewing tricks.